
Adventures With Shader Graph: Billboards
- Jonathan Moss (Crab)

- Aug 22, 2020
- 6 min read
I suppose this is the first "Dev Workshop" post for us isn't it? Well I hope these kinds of posts are a fun look into dev experiments, and time wasters that keep us sane. I actually wish I had written this up a few months ago when I first started this experiment so I could go into more detail about the process but I'll give it my best shot going over some details for it!
So what's a billboard? That's the popular term for flat planes that face the camera and attempt to trick the viewer into thinking they are something a bit more 3D. Most popular use for them would be faking spheres as seen in old Nintendo 64 games, basically every sphere in Super Mario 64 for instance being one of these billboards.
The above example video contains no spheres, as obvious by the flat clipping the orbs do against the other 3D objects, but unlike a billboard in an old N64 game these modern ones you might notice emulate the lighting angle perfectly as if they were real 3D spheres! Quite fancy isn't it? I was amazed Unity's Shader Graph had the tools to put this together!
Everything can work with these new fake spheres, even metallic reflections! Well, I suppose not everything, in the below example the key giveaway ends up being the fact that with my current knowledge they can't properly cast shadows... yet?

And of course the even worse giveaway is any time they intersect with other geometry! Gross!

But what can you do, it's 2 polygons VS 768 for the real sphere. Unless you were to make some kind of hybrid mesh of low poly but camera-facing you can't get much better right? Well..

...It's not perfect, and the illusion isn't the greatest in motion (still better than none at all) but I have been playing around with ways to taper off the edges for a more spherical look!
Somewhat comically though placing one on the corner of a block shows both the strengths of this illusion and the weaknesses. It might be impossible to ever make this 100% convincing due to the reality that it really is just a plane wobbling around in the air.
(Set these to Loop for fun times.)
Still, while not perfect in motion the static screenshots can sometimes be so good I could probably trick people into thinking these are near perfect billboard spheres haha.

Okay, so how did I make these? Well, admittedly this was one of my first major experiments to learn Shader Graph and it isn't like I am some Maths Major who understands the science behind everything being used to produce this effect, I mostly just wanted to know if it was possible! This means some parts I don't know entirely how they work, I just know the solutions I found online work and was able to Frankenstein this together with those various parts.
The first thing you will need is a Normal Map, preferably baked from a real sphere in something like Blender. This step alone does a surprisingly good job displaying the lights and reflections from Unity's shading and Reflection Probes.

Next is the big one, the math that changes the position/rotation of the Vertex Position, Vertex Normal, and Vertex Tangent inputs on the PBR Master. I built this as a "black box" sub-graph for if I ever needed to re-use it in other Shaders so here's the inputs into the sub-graph:

And here is the Billboard Sub-Graph itself:

Scary looking, I know. In simple this is taking the vector direction from the object to the camera, doing some crazy math with it to create a complex kind of rotation value with it, and then applying that rotation value to the positions, normals, and tangents. This is the kind of math that I am bad at understanding because stay in school kids, but let me try explaining what I know. (Take my word with a grain of salt, I'm not a teacher.)
The first part always surprises me that it is as simple as it is, subtracting one location in space from another gives you the Vector for them, with the Camera Position subtracted from the Object Position we have our base value that can tell the shader which way to point the object... but it's not just that simple because it needs a lot more than just which direction to point, it needs to next use this vector to generate a whole matrix of values that when the vertex positions and such are multiplied with this matrix their locations and angles are all updated properly. This is the complex part I don't entirely understand the full inner workings of.
It makes enough sense at least, you take one vector, use a Cross Product node to create another vector relative to that, then take those two vectors into another Cross Product node to get a 3rd vector resulting in some kind of odd x,y,z values that can be stacked into a Matrix. When I think about it the way a Matrix works is extremely convenient for this exact use, notably because the Vertex Position vector3 needs its three values to multiply with the Matrix's three vector3s in that exact very specific order/format. Vectors and Matrices... my brain hurts. Either way we've got our nice "rotation" value that just multiplies with those 3 other Vertex related values.
Odd note: Give or take your Quad model you may need to change the value of that vector in the first Cross Product from 0,1,0 to something else like maybe 0,0,1. I THINK that was one of the odd things that may vary depending on what you are doing. Man, I wish I could remember which mistake results in the billboard shrinking when viewed from the wrong angle... that was a funny thing to solve!
Another note: Yes the Normal and Tangent values are important, missing even one of them the lighting can get very weird very quickly. An older version of that "President Bob" test I did shows an example of some weird lighting, I think the Tangent value was wrong at the time?
Shiny lights don't tend to rotate on real spheres heheh.
The last part starts simple and gets complex, the alpha cutoff for the sphere. If you are just letting it clip into the floor you really can just use a circle texture plugged into the alpha channel of your PBR Master, you could maybe even optimize some space and hide this circle as part of the Normal Map texture.
For my fancy experimental tapered cutoff however...
Well, honestly it's not that complex right now, especially if you are already familiar with Soft Particle type shaders that fade materials into opaque surfaces.

The circle texture for this method is a little more than just a plain black and white circle, but a gradient from black to white. A linear gradient seems to work quite fine, but I want to find the exact baked height map that would give the best sphere-like curve when intersecting terrain one day. Either way, I take this circle gradient and subtract the output of my SceneDepth "black box" sub-graph from it and then multiply that result with the circle again, this gets sent over to the Alpha slot of the PBR Master. (That extra Multiply might not be needed, but it was solving a problems I was having in some cases.)

Of course I can't just mention this sub-graph without showing it, that'd be rude. This is my current best found method for taking the Scene Depth gradient and I suppose for a lack of a more accurate term "normalizing" it with the object's position on screen. There might be a better method out there but this is the one I like right now. The Depth and Thickness sliders are honestly a little odd, maybe not the best description of what they adjust, but they do manage to adjust the output gradient decently enough. Also I keep the Scene Depth as an input because it was causing some weird errors by being in the sub-graph.
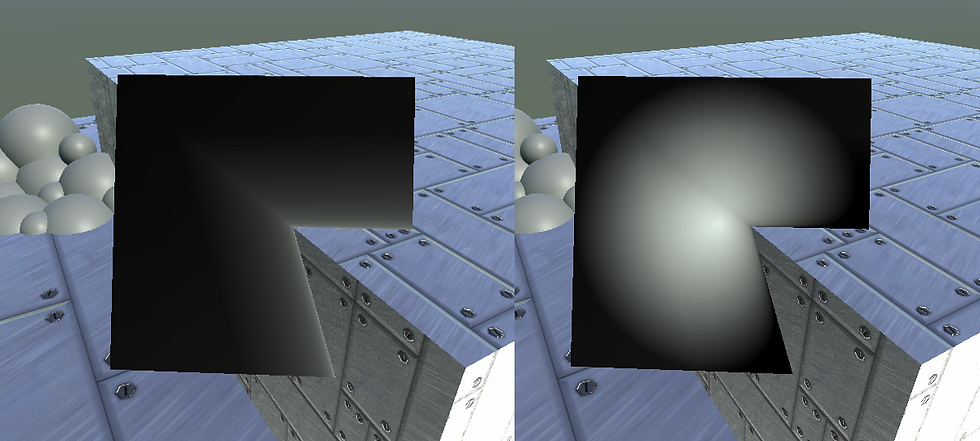
Here is the Scene Depth gradient rendered as texture color instead of alpha, and also how the circle looks with the depth subtracted from it. If there is a way to subtract more from the brighter values in an exponential kind of way the sphere-like curve might look even better, I need to do more looking for better math.
Oh yeah, and just to cover all my bases, here are some of the PBR Master and Material settings used.

Anyway... I suppose that's about everything I've learned? I wish I could have better documented the journey finding all this information, but I suppose it is still nice to write down the steps I've taken to figure out/find solutions for this experiment. Hopefully if someone is trying to learn Shader Graph and stumbles on this post some of the screenshots might have helped, or better for me maybe someone more knowledgeable can come in and correct some mistakes I might have made along the way! Either way it has been fun to write such an extensively long post detailing all this and I hope to make more posts like this!
Next I should try to figure out how to make Impostors work right! Pfft, good luck with that... I bet the real math for doing this is a lot more complicated than my crusty first attempt.
Comments